 Lekker Sun
Chapter 5 of 12
Choosing equipment and placing the panels
With the best roof areas found, it's time to choose the equipment and put the panels on the roof. Equipment lives in the bill of materials on the Equipment tab; the arrays are drawn on the Design tab.
All chapters
The equipment library
Lekker Sun keeps a library of panels, inverters and batteries with their datasheet values already filled in. When you add equipment, start typing the brand or model and pick it from the list: every value is copied in for you.
The inverters in the library are single-phase hybrid inverters of 5 to 16 kW. If your equipment isn't there yet, type it in yourself from the datasheet. Your project keeps its own copy of the values either way.
Add the panels
- On the Equipment tab, open Add in the bill of materials and choose Panel. (Adding the first array on the Design tab opens this window too.)
- Start typing the brand or model and pick it from the list, or type the datasheet values under Datasheet values.
- Check the panel's length and width: they set how big the array is on the roof.
- Enter your price per panel. You don't need a quantity: it follows the number of panels you draw.
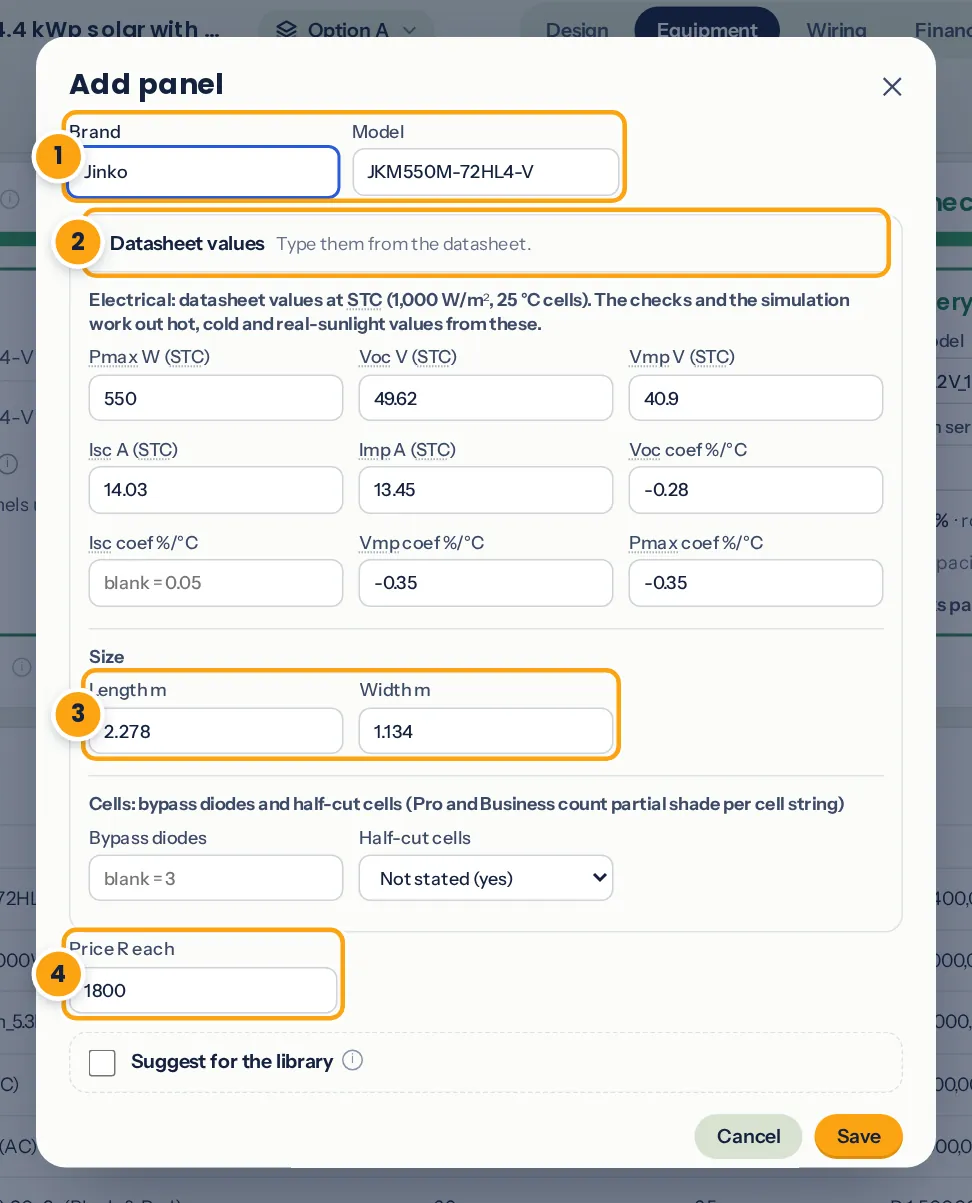
- Brand and model, with suggestions from the library.
- Datasheet values at STC, folded away when they come from the library.
- Length and width of the panel.
- Your price per panel.
Tip: type electrical values exactly as the datasheet gives them at STC (1,000 W/m², 25 °C). Lekker Sun works out the hot, cold and real-sunlight values itself. Don't pre-adjust them.
Add the inverter and battery
Add the inverter and battery the same way, from Add or from the model lists under System compatibility. The values that matter most for the checks are:
- Inverter: AC rating, maximum PV power, maximum DC voltage, the MPPT voltage window, number of MPPT inputs, current per MPPT, and the battery voltage range and charge and discharge current.
- Battery: nominal, minimum and maximum voltage, capacity in kWh, and charge and discharge current.
Our example uses a 5 kW hybrid inverter with two MPPT inputs and three 5.3 kWh, 51.2 V batteries. You can list more than one model of each; the one selected under System compatibility is the one the design uses.
Place an array on the roof
- On the Design tab, choose + Add → Solar array.
- Drag it onto the warmest part of the heatmap. On a pitched roof with Snap to roof face ticked, it lies flat on the slope and turns to face the way the slope does.
- Dragged next to another array that faces the same way at the same tilt, it clicks in beside it, above it or below it with the normal gap between panels, and the edges line up so the rows and columns carry on. This works on any roof face, flat roof or tilt frame, and with vertical and horizontal panels mixed.
- Set Rows and Columns, or drag a side handle: the array grows from the side you pull and the opposite edge stays put.
- Choose Vertical (portrait) or Horizontal (landscape). The gap between panels is under More settings.
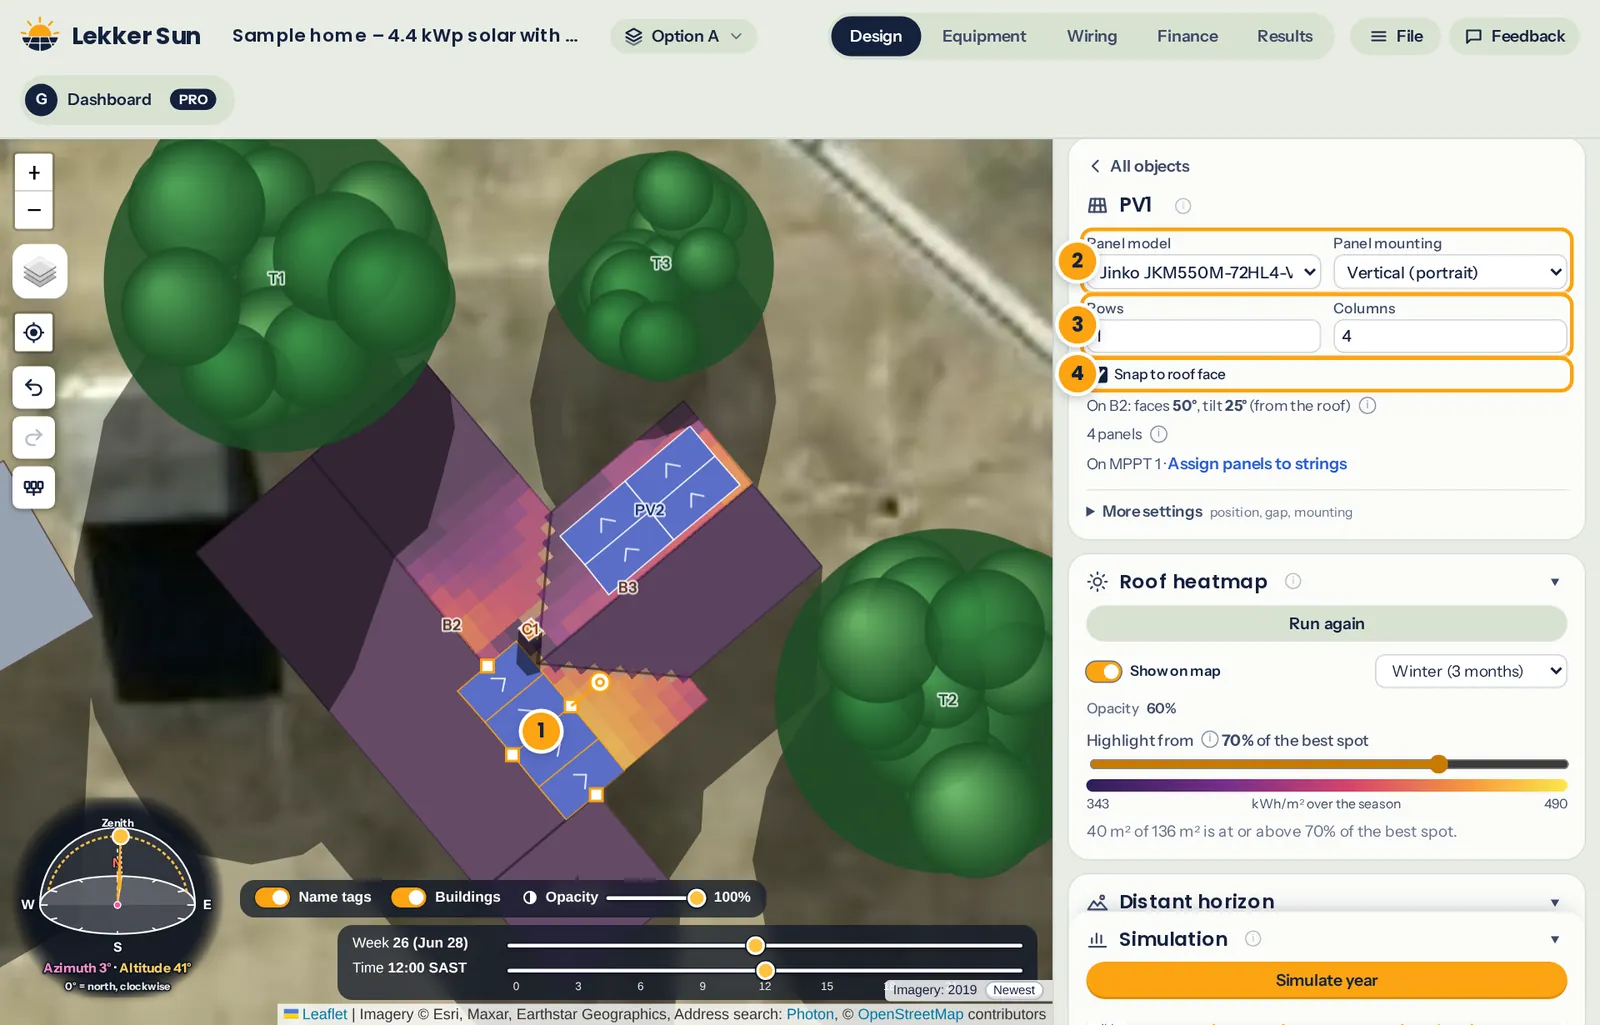
- The selected array on the roof face, over the heatmap.
- Panel model and orientation.
- Rows and columns (the gap between panels is under More settings).
- Snap to roof face, or your own azimuth and tilt.
Our example has two arrays of 1 row × 4 panels, each on its own MPPT input: array 1 on the main roof's north-east slope below the chimney, and array 2 on the back wing's north-west slope.
Angle and mounting
- Snap to roof face (on a pitched roof): the tilt is the roof pitch and the azimuth is the way the slope faces. This is what you want for panels flush on the roof.
- Untick it to set your own azimuth (0 = north, 90 = east, 180 = south) and tilt, for a tilt frame on a flat roof or a ground mount.
- Mounting sets how hot the panels run: flush on the roof runs hottest, then a tilt frame, then an open rack. Automatic picks flush when the array is snapped to a roof face, and a tilt frame when it isn't. Change it under More settings.
For a winter-first design on a flat roof, a steeper tilt (around the site's latitude plus 10 to 15°) favours the low winter sun. Leave enough space between rows that one row doesn't shade the next in June: the map's shadows at 9:00 and 15:00 in week 26 will show you.
Remove panels around obstacles
With an array selected, hover over a panel and it turns red with a −: click to remove it, for example where a vent pipe or a winter shadow sits. Hover over the gap and it shows a green +: click to put the panel back. Restore removed panels brings them all back.
Wire the arrays to the inverter inputs
In the array's settings, choose the Inverter input (MPPT) the array goes to. By default each array is one series string. Two or more arrays on the same input are strings in parallel, unless you tick One series string with the other arrays on this input to join them into one longer string.
- Arrays facing different directions should go on different inputs where you can, as in our example.
- Strings in parallel on one input should be the same length. Lekker Sun warns you if they aren't.
The strings you draw are what the Equipment tab checks. Once any array is drawn, the MPPT rows under System compatibility follow the design and are greyed out there. The next chapter covers what the checks look at.